
 |

|
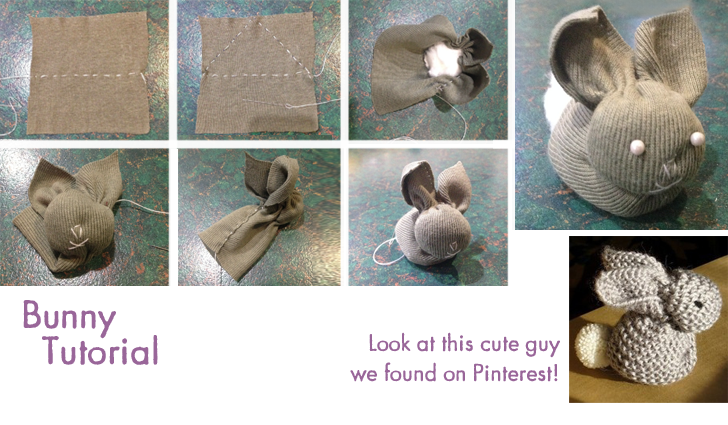
What you need:
Make this sweet little bunny with the kids this Easter holiday. All you need is a square of fabric, a needle and thread and some soft stuffing such as cotton wool. Optional extras: something to make the eyes such as buttons or beads, embroidery thread for a fancy face (see below).
NB> fairly thick stretch fabric works best for this project
Your square of fabric can be whatever size you like depending how large or small you want the final result to be. We suggest a 12 cm square. This is a good opportunity to teach the kids how to make a square by folding one edge along another to match the sides!
How to:
Using large stitches of around 6mm, stitch across the middle of the square as shown. Once you reach the other side, stitch up to the middle of the top edge then down towards your starting point. Now you have sewn a triangle shape.
Gradually ease the fabric along the stitches, tightening the thread and gathering the fabric until a pouch forms inside your triangle. This is your Bunny's head!
Fill the head with some stuffing. At this point you can push your needle through to the front and stitch a little nose and whiskers. Works well if you want to use the same threaded needle for the whole job :)
Optional fancy face: figure out where the face will be and stitch in bunny's button eyes and use some embroidery cotton to make a cute triangle nose and X whiskers.
Next, stitch finely along the remaining top edge for the bunny's body. Add your stuffing (stuff well or bunny will be floppy!). Stitch along the bottom to enclose the stuffing.
Finally, use some of your cotton wool stuffing for a tail or make a tiny pom pom tail - that's another craft for the kids to learn!
Happy Holidays!
|
||||||